When to Harvest Cannabis and How to Dry and Cure for Quality
This guide follows the practical, hands-on approach emphasized in “When to Harvest Cannabis | Harvesting, Dry, Trim and Curing” from Thunderbird Disco Homestead and focuses on the decisions that most directly affect final quality. Timing harvest to match desired effects, executing careful cannabis pruning and cutting, and managing drying and bud curing are the critical steps covered here.
Key Harvest Indicators: Trichomes, Pistils, and Plant Signals
Deciding when to harvest is primarily visual: inspect trichomes with a 30–60x loupe and watch pistils for color change. Trichome clarity moves from clear to cloudy to amber; many growers target the majority cloudy stage for peak cannabinoid expression, while increasing amber often correlates with heavier sedative notes.
Pistils that have darkened and curled back indicate maturity but are less precise than trichomes. Also note the plant’s overall signal: sugar leaves yellowing and a slowdown in new pistil growth typically accompany maturity. Use multiple indicators together rather than a single cue.
Cutting Strategy and Cannabis Pruning Before Drying
Choose a cutting approach that matches your drying space and trim preference: whole-plant harvest preserves structure and is convenient when you can hang whole plants, while branch-by-branch cuts speed handling for small drying racks. Prioritize gentle handling to avoid knocking off trichomes during cannabis pruning and transport.
Decide whether to wet-trim or dry-trim. Wet trimming removes most sugar leaves immediately and shortens hang-dry time, while dry trimming leaves more vegetation during slow dry, which can protect buds but requires more trimming effort later. At minimum, remove large fan leaves before hanging to improve airflow and reduce mold risk.
Drying Buds: Environment and Methods for Quality
Drying buds in a controlled, dark environment preserves terpenes and slows chlorophyll breakdown. Aim for stable conditions with moderate temperatures and relative humidity to prevent an overly fast or slow dry; many home growers use temperatures around the lower 60s–70s °F and RH in the mid-40s to mid-50s percent range, adjusting for local conditions and plant density.
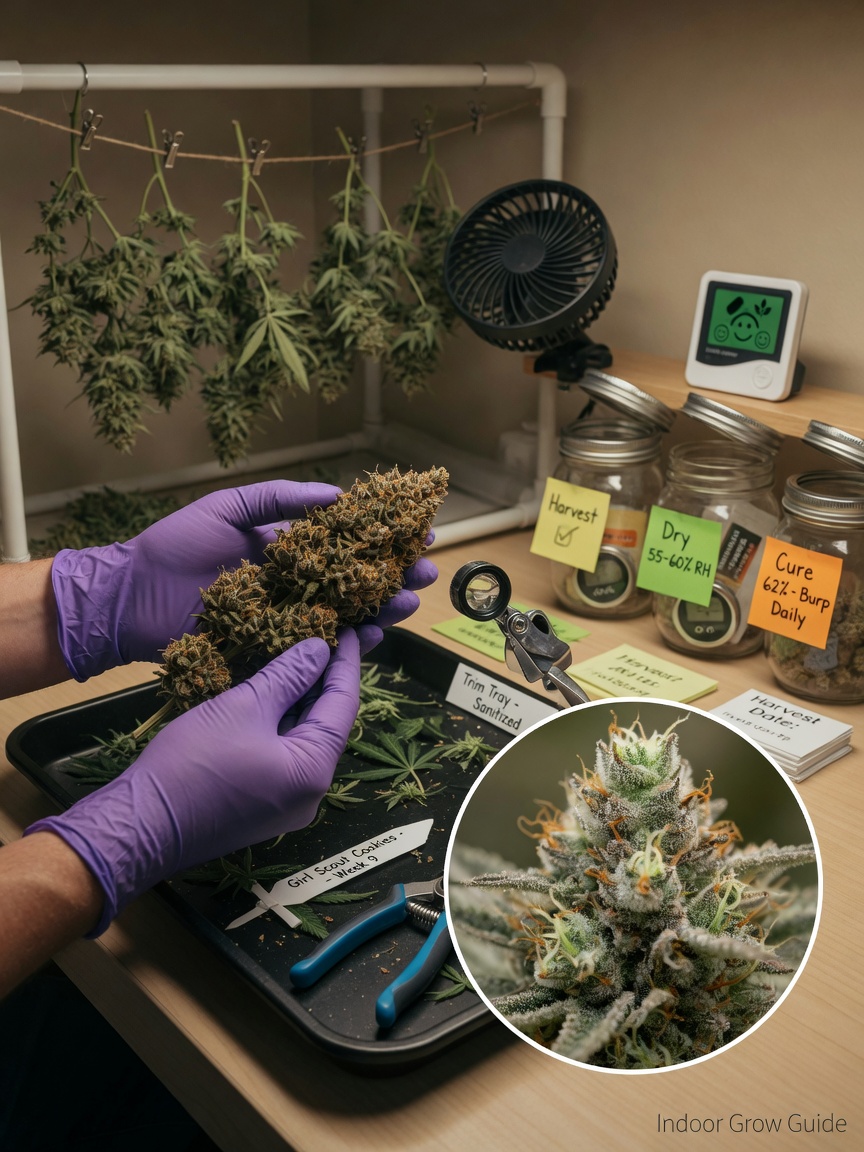
Hang branches or whole plants spaced for airflow, or place individual buds on racks if branch space is limited. Provide gentle circulation without direct fan blast on the buds and keep lights off to avoid terpene loss. Drying time commonly ranges from about one to two weeks depending on environmental control; buds are typically ready for the next step when small stems snap rather than bend.
Bud Curing: Jar Curing, Burping, and Long-Term Storage
Bud curing is where aroma, flavor, and smoothness mature. Transfer dried but not brittle buds into clean, airtight glass containers with room for gentle circulation and fill jars only partway to avoid compression. This method of bud curing slows remaining biochemical changes and lets moisture redistribute from the core of the bud.
During the first week, open containers (“burp” jars) daily for several minutes to exchange stale air and release excess moisture, watching for any signs of dampness or off-odors that could indicate mold. After the first two weeks, reduce burping frequency to every few days, then weekly, while storing jars in a cool, dark place for several weeks to months for optimal maturation. Use humidity-control packs or small hygrometers inside representative jars if you want tighter control of internal RH during curing.
Practical Harvest Timeline and Checklist
Before harvest, confirm legal allowances in your area and plan for labor: trimming and curing require time and space. Checklist: inspect trichomes and pistils to time harvest, choose whole-plant or branch cuts based on drying space, remove fan leaves and perform basic cannabis pruning, hang or rack buds with good airflow, control drying temperature and humidity, move dried buds to jars for bud curing, and burp jars according to moisture level.
Throughout the process prioritize cleanliness and slow, consistent environmental control. Proper drying buds and patient curing reduce harshness, preserve terpenes, and improve long-term smoke or vapor quality.
Monitoring Quality and Avoiding Common Pitfalls
Watch for mold during both drying and curing: musty or sour smells, visible white fuzz, or unusually damp spots require immediate attention and possible disposal. Overdrying can make buds brittle and degrade flavor, while underdried buds packed into containers may trap moisture and rot; balance is key.
Test small samples after two to four weeks of curing to evaluate flavor and smoothness, then continue curing longer if desired. A methodical approach to harvest timing, careful cannabis pruning at cut, controlled drying, and mindful bud curing will yield the best combination of potency, aroma, and mouthfeel for indoor-grown cannabis.