
Make the medium choice that matches your time and tolerance for monitoring
If you’re deciding between soil, coco, and hydroponics for your first indoor grow, start by matching the medium to how much daily attention you want to give the plants. Soil gives a forgiving buffer for nutrients and mistakes, coco coir speeds growth with more frequent watering and careful pH, and hydroponics rewards precision with faster yields but requires routine checks of pH and EC levels.
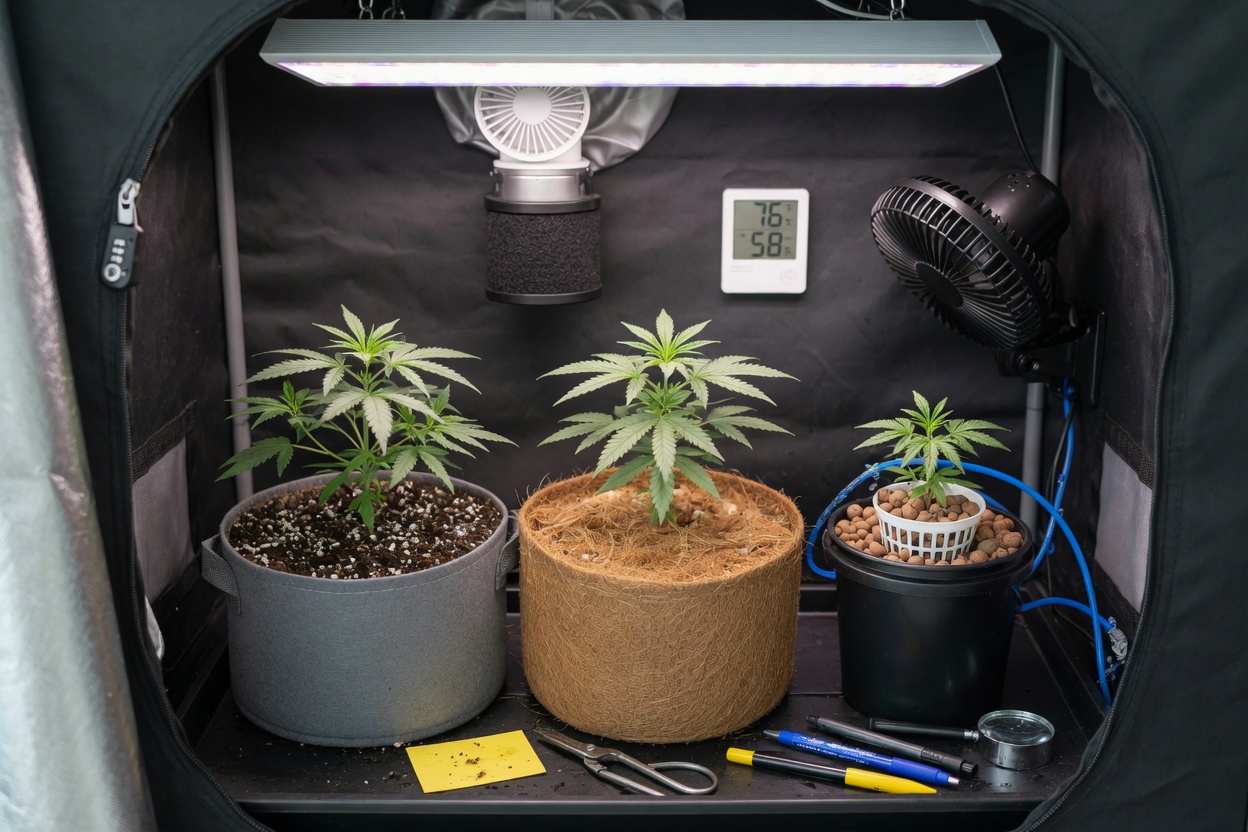
Before selecting a substrate, consider your space—many beginners use a compact grow box for marijuana because it limits odor and light leaks. Your seed selection and how you start germination will also affect which medium is easiest to manage initially.
Choosing seeds and practical germination steps
Pick reliable seeds and decide between autos and photoperiods based on how long you want to veg. Autos reduce the need for a strict light schedule but limit long vegetative training; photoperiod seeds allow more control if you plan to train plants with topping or SCROG.
For germination, keep methods simple: a moist paper towel or small starter plug produces consistent results when kept warm and dark. Avoid overhandling the taproot once it emerges; transfer seedlings gently to your chosen medium and keep initial nutrients light to prevent burn.
Soil vs coco: practical differences for a beginner setup
Soil is the most forgiving medium because it buffers pH shifts and retains nutrients, which reduces daily monitoring. Use a loose, well-aerated potting mix and expect less frequent watering cycles; soil typically functions well with pH in the 6.0–7.0 range and tolerates occasional misses from new growers.
Coco coir drains faster and encourages denser roots, but it requires you to manage pH in the 5.5–6.5 window and to use calcium/magnesium supplements regularly. Watering frequency increases, and you should monitor runoff TDS or EC more closely than in soil to avoid nutrient lockout.
Hydroponics basics: systems, pH and EC for growing, and oxygenation
Hydroponics systems (DWC, ebb-and-flow, and NFT among common choices) place nutrient delivery and oxygenation under direct control, so watch pH and EC for growing closely. Target a pH generally between 5.5 and 6.5 and keep EC within a conservative range appropriate to stage—lower for seedlings, ramping up for vegetative and early flower—but always increase slowly to avoid shock.
Hydro requires routine maintenance: sterilize reservoirs, maintain dissolved oxygen with air stones or pumps, and check EC daily. The payoff is faster growth and efficient use of fertilizers for cannabis, but it is less forgiving of neglect than soil or coco.
Designing lighting, ventilation, and the microclimate for a small room
Choose LED panels or HPS depending on budget and heat tolerance; LEDs often suit small spaces due to lower heat output. Match light intensity to plant stage—gentler in seedling and stronger in flower—and keep the fixture-to-canopy distance per manufacturer guidance to prevent light stress.
Control the microclimate for cannabis by targeting comfortable temperature and RH ranges: vegetative growth prefers warmer temps and moderate RH, while flowering benefits from slightly cooler nights and lower humidity. Use an oscillating fan for airflow, an exhaust fan sized to exchange the air in the grow box or tent, and consider a carbon filter if odor is a concern.
Feeding schedules, plant training, harvest timing, and managing pests
Begin with a simple nutrient schedule tailored to your medium: weaker doses in soil and precise ppm/EC targets in coco or hydroponics. Track EC and adjust slowly; many growers reduce nitrogen as flowering progresses and shift to bloom-focused fertilizers for cannabis to support bud development.
Training techniques such as low-stress training (LST), topping, and screen-of-green (SCROG) help control canopy shape and light penetration indoors. Start training in veg when plants are healthy; avoid major cuts late in flowering to reduce stress.
Monitor plants for pests and cannabis diseases regularly—early detection prevents small issues from becoming infestations. Use integrated pest management: sticky traps, manual removal, and biological controls as first lines, and isolate affected plants if possible while you treat them.
Practical checklist before your first run
Balance ambition with manageability. If you prefer low maintenance, choose soil and simpler feeding; if you want faster cycles and can check pH and EC daily, coco or a basic hydroponics setup will reward you.
Always finalize room layout, select appropriate lighting and ventilation, prepare seed germination materials, and assemble monitoring tools: a reliable pH meter, EC/TDS meter, thermometer/hygrometer, and an adjustable fan and exhaust. Keep a log of feedings, pH, EC, and training moves to learn from each cycle.
For a compact primer on cultivation terminology and broader context that complements these practical steps, consult this Cannabis cultivation overview on Wikipedia, which outlines common systems and historical practices that inform modern indoor methods. Finally, check local laws before starting—home cannabis cultivation rules vary widely, and staying compliant protects you and your grow.
Start small, measure often, and treat each cycle as a learning process. With attention to seed germination, medium demands, lighting, microclimate, and basic pest vigilance, your first indoor grow can be a controlled and informative experience rather than a trial-and-error scramble.